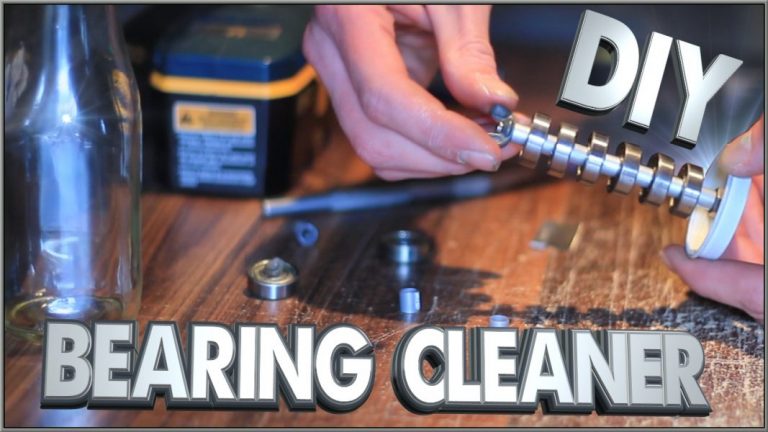
A bearing cleaning kit is a must for any DIY mechanic. Here we will educate you on how to make a bearing cleaning kit.
When it comes to bearings, the cleaner you can get them, the longer they’ll last, and the smoother your project will turn out. I’m going to show you how to make your bearing cleaning kit.

Types of Bearing Cleaning kit
There are two types of bearing cleaning kits: Wet and Dry.
A wet bearing cleaning kit is when you soak the bearings in some cleaner. The cleaner can be anything from WD-40 to Simple Green to degreaser or any other type of oil or solvent that’s flammable.
Submerge your bearings in a cleaner container and let them sit for an hour or so. Once you’ve pulled your bearings out of the cleaner, dry them off by spinning them rapidly between two fingers for about 10 seconds. Your bearing will feel smooth as it spins.
The second type of cleaning kit is a dry “brushing” kit. This means that you do not use any solvents but instead brush the bearings off. The purpose of this kit is to remove surface grime and dust that you can’t get out with just your fingers alone.
This takes a little bit longer than the wet cleaner method since it’s not soaking what you’re wiping off, but I find brushing to be much more effective, and it’s safer than immersing bearings in fluids.
Bearing Cleaning Kit
- Recycle Plastic Box With Large Lid
- An extra ballpoint pen case (if it is available)
- One scissors
- ¼” washer
- 2-inch x 14-inch ” nuts
- A bolt of ¼” x 6”
Step-by-step instructions on how to make a bearing cleaning kit
1. Remove any components that can be easily removed from the bearing you’re working on. This includes washers, shields, circlips, and in some cases, sealed bearings will have removable rubber seals on their backs.
2. Wash your hands with soap to remove any oils/dirt/greases before working on the bearings.
3. Remove the caps on your bearing by popping them off with a pen or screwdriver if they are in there snuggly, or give them a little tap on something hard to dislodge them (a tabletop works fine).
4. Grab your washer and line it up with one of your bearing caps.
5. Take your pen case and cut it into a strip that is about 2″ long by ¼ “wide or whatever dimension will fit through the center of your bearing cap’s outer race. The tighter the tolerance of this hole, the better, so you don’t have to spend more time on this part than you need to. A box-cutter and ruler make quick work of this task, but if those aren’t available, you can use a drill or some tool that cuts through the plastic.
6. Insert your strip of recycled pen case through the center of your bearing cap so that it’s on top of the washer inside the cap.
7. Insert your bearing cap and washer/pen case combo onto the shaft of the bearing race you want to clean.
8. If your bearings are particularly dirty, take your pen case out and give it another pass through the bearing’s opening with a bit more elbow grease (you may need to twist it around a bit). If the pen case is giving you an issue, use your scissors to cut into it and remove any excess plastic that might be getting in your way.
9. Take your washer, bolt, and nuts. Insert the bolt through the washer so that three threads are sticking out on each side of the washer (the washer is sitting in the middle of the bolt).
10. Screw your nut onto one side of the bolt, but leave it loose enough that you can turn it back and forth by hand.
11. Insert your bolt/washer/nut combo into the center of your bearing’s race with the nuts facing down. Spinning the nuts with your fingers will wipe any dirt or grime off of the bearing race.
12. Once you’ve cleared all of the visible grime from your bearings, give them a few more spins on some paper to dry them off. This step ensures that no extra debris falls into the bearing once its reassembled.
13. Remove your pen case by pulling it out of the bearing’s race.
14. Replace your washer, bolt, and nuts into their original positions to reassemble your bearings.
15. Enjoy a nice cheap, clean set of bearings!
how to use Acetone Cleaning Bearings Solution
Acetone is the best cleaning solvent for the bearings of skateboards and longboards.
It is a safe solvent, which means it won’t cause any harm to your bearings or urethane wheels.
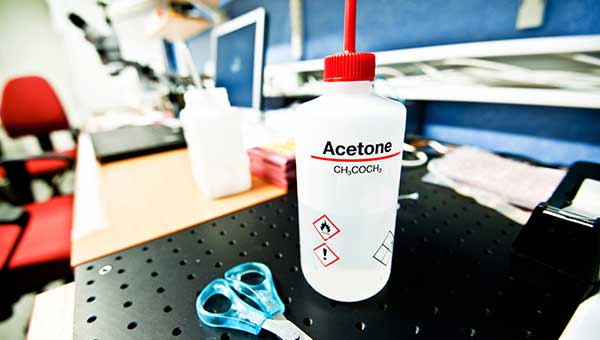
1. Put the skateboard bearings into a small bowl and add acetone cleaner to it.
2. Let them sit for about 15 minutes until thoroughly cleaned from inside with this solution.
3. Rinse them properly with water and let them dry.
4. If you want to clean the bearings again, add more acetone cleaner to them and repeat steps 1-3.
Essential tips for Manually cleaning skateboard bearings
- Make sure your skateboard is clean and grease-free before you start cleaning. If there’s a lot of dirt on the surface, use a soft/damp cloth to wipe it off first.
- Cleaning bearings becomes easier if they are really dirty or greasy.
- Prepare all the necessary things that you need before you start cleaning the bearings of your skateboard.
- You can use a Q-tip, toothbrush, pen case, or washer to clean the inside of the bearing.
- If you are using a cotton swab for this purpose, make sure it is completely dry before using it for cleaning your bearings. Because using a wet cotton swab can damage your bearings.
- Before removing the dust and dirt from the inside, ensure that you have disassembled your skateboard’s trucks properly. If you don’t know how to do it, refer to our article on How to Disassemble a Skateboard Trucks.
- Once the components of your board are ready, place your bearings on the drilled holes of the skateboard deck.
- Fill an empty bowl with acetone or any other solvent and let the bearing sit in it for about 15 minutes.
- If you are cleaning more than one bearing, make sure to increase the amount of acetone. Soak all the bearings at the same time for better results.
- Once the time is up, remove your bearings from the solvent and clean them properly with a brush, pen case, or a Q-tip.
- Clean the dust and dirt from inside the bearing’s cavity carefully so that you don’t damage it further. You can use a cotton swab to do this job.
- Rinse your bearings using water and wipe them with a clean cloth to keep the dust away.
- Allow the bearing to dry for about 5-6 hours before reassembling it.
My Experience Using The Kit
I find that it can take a bit more time than soaking your bearings in a solvent, but the peace of mind you get from knowing that there aren’t any residual chemicals or contaminants is well worth the extra time it takes to clean your bearings this way.
I’ve been using this kit for a while now with great success. I only use solvents when necessary and for most bearing’s my kit alone does the job well.
I use my pen case and washer method to clean out the bearing’s housing, take a half cotton ball, dip it in the solvent, run that through the bearing, and let it dry for a few minutes before reassembling.
Then I spin the bearings up on some paper to eliminate any residual solvent or dirt that might still be inside the bearing.
Conclusion
This is a nice cheap and easy way to clean your bearings, but you can’t expect it to perform like a top-end bearing solvent.
Solvents and ultrasonic cleaners will always be the superior option for getting your bearings spic and span. If you don’t have access to solvents or want an easier cleaner then this is a good option.
If you’re on a budget and can’t afford solvent, then this might be the best way to go as long as you expect it to take more time than solvent.